Showing posts with label Holidays. Show all posts

Saturday, August 3, 2013

February Club Projects

I know this is long overdue, but here are the club projects from February!  I am slowly but surely getting caught up! :o)

Our first project was a broach for St. Patrick's Day using the Designer Rosette XL Die as well as some ribbon and "smooshed" bottle caps from the Occasions Spring Catalog.  The image in the middle was created using My Digital Studio and the Lucky Shamrock digital stamp!  It was sized to fit perfectly in the bottlecap (1"):


Secondly, we did a scrapbook page using the "Sycamore Street" coordinating product line from the 2013 Sale-A-Bration brochure.  The stamp, "Amazing Family" was debuted in the Occasions Catalog and is still available!  It is such a great scrapbook image because it is so versatile in it's choices of family titles! In fact, everyone in the class got to pick the family title they wished to use for their scrapbook page.  I chose "Brother" to highlight this wonderful pic I have of my two boys!


Saturday, November 17, 2012

November Club Projects

For this month's club we focused on Christmas and projects for gift giving!

First, we made a set of three gift tags (although this design could also very easily translate to a Christmas ornament or and embellishment of the front of a Christmas card!):


Each of the tags were made using the Windows Frames framelit dies and the windows were cut using the Holiday Collection framelits.  Behind each window we used various SU ribbons layered in different patterns or angles. 


Everyone also had the option of using the matching Festive Paper Piercing pack to add an extra flair to their tags:


Our second project was a gift card holder using the Holiday Stocking Bigz Die:


We used several great SU products to pull it all together and give it a perfect vintage Christmas feel:  the Music Notes standard wheel in Always Artichoke ink, Cherry Cobbler Core-dinations cardstock embossed with the Lacy Brocade Embossing folder and then sanded with the new Stampin' Sanding Block, a touch of Champagne Glimmer paper, and finally a bow of our ever-so-stampable Cotton Ribbon also stamped with the Music Notes wheel:


Tuesday, January 3, 2012

Saying goodbye...

Today is the last day to order from the Holiday Mini Catalog before the Occasions Mini goes live tomorrow!

Here's a few of my favorite products and projects from the holiday mini... and at the end of this post is a link to the products that will be carrying over!

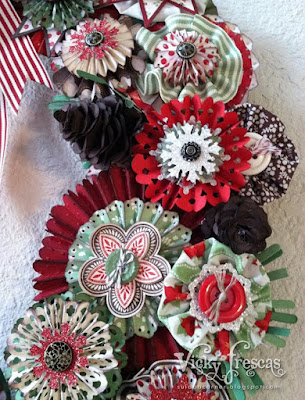
I really had a blast making this wreath at a class my downline, Michelle Walker, held.  It was a lot of work, but well worth it in the end!  This is a wreath I will be proudly displaying for many Christmases to come!

At the class, we could choose which products we wanted to use, and I chose the Holly Berry Bouquet product suite from the Holiday Mini catalog.


The wreath featured a whole lot of fan fold flowers using the brand new Simply Scored tool as well as some Yoyo's made from the Designer Fabric!  


Here is a gorgeous wreath my upline, Alecia Connelly, made using the Spice Cake product suite:


And here's the one that started it all - made by the class instructor (and my downline AND BFF), Michelle Walker! :o)


Speaking of the Spice Cake product suite (which happened to be my favorite from the catalog) - I used it to make a Thanksgiving scrapbook page:


...and a lovely birthday card!:


Lastly, I made a witches hat with a hodge podge of products!


I featured a distressed banner using the Hand-Penned holidays stamp set from the Holiday mini:


For the loads of seam binding ribbon, I jut hand-dyed our very vanilla ribbon using the Cajun Craze and Concord Crush reinkers!  I think they turned out great! :o)

So.... if there's anything you fell in love with in the Holiday Mini catalog, get off your patootie and into my online store to get your order in before midnight MST!  And while you're there, don't forget to check out the clearance rack blitz still going on until January 5th!!!

Click here to view the holiday mini in PDF format.

Click here to see the carryover flyer for the holiday mini! (These are the products that will still be available to order after the 3rd).


Friday, March 11, 2011

Happy News + January Club Projects

Hello All! Wow... it sure has been a long time!  Well, over the holidays DH and I found out we are expecting baby #2!  This was most welcome and prayed about news - we could not be more excited and happy!  Unfortunately, my body did not take the news so well and I had a very exhausting and queasy first trimester.  And instead of "morning sickness" I had a daily and consistent case of "afternoon and evening sickness."  This did not bode well for my stamping productivity, as the evenings are my time for stamping and creating.

Well, long story short... my poor blog suffered the consequences - hence the lack of posting lately.  So, here I am - finally into my second trimester and my energy is on the rebound!  So I'm taking a little time to get caught up and get up my pics for my last 2 months of clubs!

First, I'm going to post January's projects, where we had lots of fun making Valentine's day projects and playing with bubbles!

Yes, that's right!  Bubbles!  The card we made featured an awesome technique I learned at the St. George regionals last September, and I had been dying to use it!


This was so much fun to do, and all it required was a bowl, a straw, some bubble solution and some Stampin' Up! classic ink refill!  Simply mix the bubble solution and your ink in a bowl, stick the straw in and blow some bubbles!  Once the bubbles rise above the lip of the bowl, touch your card stock piece onto the bubbles and a beautiful pattern will appear! Click Here to see a great tutorial video for this technique put together by fellow demo, Dawn Olchefske!


To add a little extra pizzaz to our card, we sprayed a bit of Vanilla Shimmer Smooch on top! The stamp set used on the card was the "Filled With Love" set available from the Holiday mini and during the Filled With Love promo.  We finished off our card with some Basis Black satin ribbon, some of the new pom pom trim (from the Occasions mini) and some lovely rhinestones!

Our second project was another one I had been itching to try in one of my workshops.  I received a version of this gorgeous treat box during my trip to Founder's Circle last September.  I instantly fell in love with the idea and knew it would fit in perfect for the V-Day theme, but at the same time also work great for any other occasion.


This adorable treat box uses the Perfect Setting XL Die for the Big Shot.  When you flip open teh top (made from the 2-1/2" circle punch), you can place a cupcake liner and your treat or gift inside!


The key to getting the size just right, so your cupcake liner doesn't fall out of the bottom, is to overlap the ends by one scallop when putting the cupcake piece together:


For our treat holders, we used a simple but lovely color scheme of Crumb Cake and Pretty in Pink.  The stamp set is "Valentine Defined" from the Occasions Mini Catalog.


Thursday, January 27, 2011

"Love" Mini Album Class!

Hello everyone!  Just wanted to pass on this great opportunity!  One of my recruits, Michelle Walker, is having her very first class on how to make a mini album for Valentine’s Day!  The class will be held on Saturday, February 5th from 12-4!


This is one absolutely gorgeous album with some amazing techniques… I can’t wait to learn how to make those flowers!  And what a great opportunity to create a very special handmade gift for that special someone on Valentine’s Day!

All information on the class can be found here on the the class flyer.  Please contact Michelle directly if you would like to attend!

Hope to see you there! :o)


Friday, December 24, 2010

December Club Projects

For this month's projects we focused entirely on different techniques using the Watercolor Wonder Crayons!

First, we made an ornament/gift card holder with the Holiday Line-up stamp set.  Everyone got to choose which image they wanted to use, then we used the WWCs to color the image.  For this technique, we colored onto a hard plastic surface with the WWC and then used an Aqua painter to pick up the color and transfer it onto the image.  


This fabulous gift card holder idea was passed on to me from my upline, Alecia Connelly!


Our second project was a desktop calendar.  You can find a tutorial for this nifty idea here!  We used the Friends Never Fade stamp set and a color combination of Regal Rose, Rose Red, Always Artichoke and Early Espresso.


We used two different WWC techniques on this project.  For the background image, we used the crayons to color directly onto the stamp and then we misted the stamp with some water before stamping onto the watercolor paper.  

For the sentiment, we first stamped the image in Early Espresso craft ink and then applied embossing powder and heat set it.  Then we used the crayons to directly color onto the paper. Lastly, we blended the color using an aqua painter.


I got the calendars we used in our project here, and they can also be purchased in other sizes and varieties here.

For demonstrations of all the different watercolor techniques we used, watch this great video from Stampin' Up!


Lastly, I wish each and every one of you a very merry Christmas and a happy New Year!!!


Friday, December 17, 2010

"Merry Christmas" Blocks

Here's a fun little project I put together in a snap!  I used some pre-cut wooden blocks from my local craft store and died them with a solution of classic re-inker and alcohol.  The blocks sucked the ink solution right up, held the color beautifully and dried in a snap!  I used Cherry Cobbler, Always Artichoke and Soft Suede as my color scheme.


I stamped my letters (Broadsheet Alphabet) in Versamark and embossed them in gold stampin emboss powder.  This is such a beautiful font for vintage Christmas items!


Thursday, December 16, 2010

November Club Projects

Wow!  Sure has been a while since I've posted!  I am bit behind, and for that I'm sorry!  The holidays are just such a very busy time for me!  Needless to say, I have a whole lot to post, and then I'll probably be MIA again until after the holidays!

So here we are... club projects from last month! :o)  (Like I said... I'm Sorry!!!!) lol

First, we made this fun oragami box - perfect for holding a special gift for a special someone!  My inspiration and the full instructions can be found here!


For our version in club, we used Very Vanilla 12 x 12 card stock (textured) for the box and then covered it using the Jolly Holiday DSP.  The stamp sets used were Winter Post and Perfect Punches.

Our second project was a twirling card I designed, where the little snowman twirls around when you open it! (Stay tuned for a tutorial!) We used many great techniques to finish it off!


We embossed the front of the card with the Northern Flurry Textured Impressions Embossing Folder and then used a Versamarker to ink the top of the snowflakes and heat emboss them with Iridescent Ice embossing powder.

We used the Cute Christmas stamp set and colored our snowman image using Aqua Painters and classic ink. Our color palette was Blushing Bride, Baja Breeze and Whisper White.  After we colored our snowman, we also used the Versamarker and Iridescent Ice embossing powder to give him some sparkle!


The inside of the card was decorated with some snowflakes from the Northern Hearts Level 1 hostess set in the holiday mini (Did you know these snowflakes perfectly match the ones in the embossing folder?) ;o)  We also stamped "Have a Cute Christmas" underneath our snowman on the left side.


My favorite aspect of the card was the ribbon dying!  We died a piece of Very Vanilla Seam Binding with Blushing Bride ink!  I have a video tutorial I am putting together for this technique, so stay tuned! :o)


Saturday, November 13, 2010

"Thankful" Banner

Hello friends!  Here is a Thanksgiving banner I made for my fireplace mantle using the Day of gratitude stamp set and the custom ink pad technique we did in club last month.  The banner was completely inspired by a fall banner I saw at the St. George Regional made by SU's #1 Demonstrator of the year, Kimberly Van Diepen!


Here are each of the banner pieces close up... I have provided a list of primary supplies at the end of this post!


(Your eyes are not deceiving you.... the ribbon above and below has been dyed in Cajun Craze and More Mustard! Stay tuned for a video tutorial on this soon.... for those who attend my club workshop, we'll be learning how to do this on Sunday!)


My favorite aspect of this project was the gathering techniques for the ribbon!  (Another technique I'll be demoing in my club workshop this weekend!) ;o)


Another custom dyed ribbon in More Mustard:


Here's just a quick look at what each banner piece looked like at the beginning... After stamping my images using my custom ink pad, I sprayed three layers of my custom Smooch Spritz colors:  1) a liberal spraying of Crumb Cake, 2) A couple of squirts of Soft Suede, 3) one spritz of Early Espresso. 


After the pieces dried, I distressed the edges and inked them with some crumb cake.

Here are the primary supplies and colors used for the project:

I also used a big variety of our ribbons, buttons, and other hardware to put the finishing touches on this project.  If you have any questions at all about them, please ask! :o)  

Thanks for looking, and I hope you have been inspired to make your very own Thanksgiving banner!


Search My Blog