Showing posts with label Home Decor. Show all posts

Wednesday, October 9, 2013

"Fall Theme" Altered Frame & Birthday Card


With fall now upon us, I thought I would post this fall-themed frame and card I made for my dad for his birthday!


I used the Autumn Accents Bigz die and several embossing folders (Argyle, Lattice, Houndstooth, and Chevron) for the leaves on the frame: 


For the card, I used the coordinating stamp set, Wonderfall:


Thursday, August 8, 2013

Pennant Banner

I made this banner a while back and wanted to share it with you!  It adorns my craft room and it was just a joy to make... one of those things that just came together beautifully. :o)


To make the pennant, I created a template out of chipboard and traced it onto my paper and cardstock to get the size I needed.  I inked all the edges of my pieces with Soft Suede to give it the vintage look I wanted.


I added some additional details that really made a difference and kicked it up a notch on my butterflies: Basic Pearls Jewel Accents, and Dazzling Details iridescent glitter glue:


List of primary supplies used:
Everyday Enchantment DSP (in clearance rack for $2.19!!!)
Large Lace Ribbon Punch (clearance rack - $11.99!)


Tuesday, January 3, 2012

Saying goodbye...

Today is the last day to order from the Holiday Mini Catalog before the Occasions Mini goes live tomorrow!

Here's a few of my favorite products and projects from the holiday mini... and at the end of this post is a link to the products that will be carrying over!

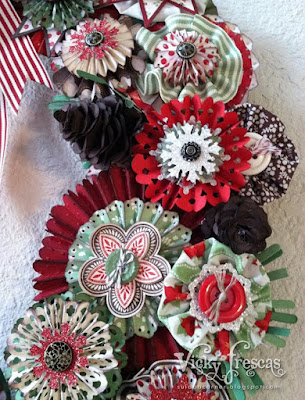
I really had a blast making this wreath at a class my downline, Michelle Walker, held.  It was a lot of work, but well worth it in the end!  This is a wreath I will be proudly displaying for many Christmases to come!

At the class, we could choose which products we wanted to use, and I chose the Holly Berry Bouquet product suite from the Holiday Mini catalog.


The wreath featured a whole lot of fan fold flowers using the brand new Simply Scored tool as well as some Yoyo's made from the Designer Fabric!  


Here is a gorgeous wreath my upline, Alecia Connelly, made using the Spice Cake product suite:


And here's the one that started it all - made by the class instructor (and my downline AND BFF), Michelle Walker! :o)


Speaking of the Spice Cake product suite (which happened to be my favorite from the catalog) - I used it to make a Thanksgiving scrapbook page:


...and a lovely birthday card!:


Lastly, I made a witches hat with a hodge podge of products!


I featured a distressed banner using the Hand-Penned holidays stamp set from the Holiday mini:


For the loads of seam binding ribbon, I jut hand-dyed our very vanilla ribbon using the Cajun Craze and Concord Crush reinkers!  I think they turned out great! :o)

So.... if there's anything you fell in love with in the Holiday Mini catalog, get off your patootie and into my online store to get your order in before midnight MST!  And while you're there, don't forget to check out the clearance rack blitz still going on until January 5th!!!

Click here to view the holiday mini in PDF format.

Click here to see the carryover flyer for the holiday mini! (These are the products that will still be available to order after the 3rd).


Friday, December 17, 2010

"Merry Christmas" Blocks

Here's a fun little project I put together in a snap!  I used some pre-cut wooden blocks from my local craft store and died them with a solution of classic re-inker and alcohol.  The blocks sucked the ink solution right up, held the color beautifully and dried in a snap!  I used Cherry Cobbler, Always Artichoke and Soft Suede as my color scheme.


I stamped my letters (Broadsheet Alphabet) in Versamark and embossed them in gold stampin emboss powder.  This is such a beautiful font for vintage Christmas items!


Saturday, November 13, 2010

"Thankful" Banner

Hello friends!  Here is a Thanksgiving banner I made for my fireplace mantle using the Day of gratitude stamp set and the custom ink pad technique we did in club last month.  The banner was completely inspired by a fall banner I saw at the St. George Regional made by SU's #1 Demonstrator of the year, Kimberly Van Diepen!


Here are each of the banner pieces close up... I have provided a list of primary supplies at the end of this post!


(Your eyes are not deceiving you.... the ribbon above and below has been dyed in Cajun Craze and More Mustard! Stay tuned for a video tutorial on this soon.... for those who attend my club workshop, we'll be learning how to do this on Sunday!)


My favorite aspect of this project was the gathering techniques for the ribbon!  (Another technique I'll be demoing in my club workshop this weekend!) ;o)


Another custom dyed ribbon in More Mustard:


Here's just a quick look at what each banner piece looked like at the beginning... After stamping my images using my custom ink pad, I sprayed three layers of my custom Smooch Spritz colors:  1) a liberal spraying of Crumb Cake, 2) A couple of squirts of Soft Suede, 3) one spritz of Early Espresso. 


After the pieces dried, I distressed the edges and inked them with some crumb cake.

Here are the primary supplies and colors used for the project:

I also used a big variety of our ribbons, buttons, and other hardware to put the finishing touches on this project.  If you have any questions at all about them, please ask! :o)  

Thanks for looking, and I hope you have been inspired to make your very own Thanksgiving banner!


Tuesday, October 12, 2010

Halloween Extravaganza - Day 12

Today is the last day of my Halloween Extravaganza, and I saved my favorite project for last!  We made this "BOO" banner in my hostess club last month, it was so very fun!


Each pennant was made using Basic Black Card stock and paper from the in-color Patterns DSP stack.  We used a different color for each pennant:  Peach Parfait, Concord Crush and Pear Pizazz.  We stamped on the  black card stock using the "From the Crypt" stamp set and Frost White shimmer paint.  

The letters were cut out using the Alphabet Simple Letters Big Shot die and they were mounted on a fan-fold flower (find a great tutorial for those here).  We hung the pennants on a yard-long piece of 1-1/4" striped grosgrain ribbon (in Basic Black) and tied individual bows above each pennant in their coordinating color of 1/2" stitched poly ribbon.


Thanks so much for joining me during my Halloween Extravaganza!  I hope you had a great time on got lots and lots of inspiration for my projects! :o)


Saturday, October 2, 2010

Halloween Extravaganza - Day 2

Day 2 of the Halloween Extravaganza features one of the projects we'll be making at the upcoming Stamp Camp!

I CASEd this fabulous idea from fellow demo (and Founder's Circle attendee), Deb Valder!  We'll be making the luminary on the right at stamp camp... so no detail for this post today... you'll have to come to Stamp Camp to learn how to make it! (Aren't I just a stinker!) ;o)


See you tomorrow for more Halloween treats! :o)


Search My Blog