Showing posts with label Halloween. Show all posts

Monday, November 12, 2012

September Club Projects

As usual, I am very behind in my posts!  It always seems like the holidays get that way for me... Plus we have several family birthdays that keep me on my toes making handmade gifts this time of year. :o)

Regardless (and even though Halloween in far behind us), I want to get caught up with my club project posts... and I've got to go all the way back to September to do that! So here are the Halloween projects we made in hostess club!

My favorite has to be the pinwheel corsage I came up with.  And this is another reason why I am still bothering to post this so late... it would be a great project to make for any holiday or special event!  Birthdays, Baby Showers  Bridal showers, graduations... you name it!  I plan to make several more of these in the near future and can't wait to come up with different color combos!


We used the Ornament Keepsakes stamp set and matching framelit dies to make the pinwheel.  After stamping and cutting 9 of them, we just stacked them and punched a 1/16" hole at the top of the ornament then placed a brad through and fanned them out (don't forget to curl up the edges a bit!).  In order to get them to lay right, you need to cut a slit in the top one and slip it over the bottom one when they come around and meet each other.  Once they are fanned out and evenly spaced, just stick the whole pinwheel onto a jumbo sticky round!  We embellished the bottom (attached via the back) with several coordinating ribbons and on the front we used the Ghoulish Googlies stamp set cut out and layered with the Window Frames framelits.

I got the idea for our second project (Bitty Boo Boxes) from fellow demonstrator Brenda Quintana.  These are made using the Petal Card punch and she has an excellent tutorial posted on her blog for them here!    


Lastly, we made a VERY quick and easy project using the Ghoulish Googlies Bundle from the holiday mini.  We embossed the bags with the Spider Web embossing folder and also decorated both sides of the bag with a tag.  On one side, we stamped the Mummy from the Ghoulish Googlies set:


And on the other side, we used the smaller tag that comes with the kit and stamped it with the "Spooky" sentiment from the Wicked Cool Stamp set:


Tuesday, January 3, 2012

Saying goodbye...

Today is the last day to order from the Holiday Mini Catalog before the Occasions Mini goes live tomorrow!

Here's a few of my favorite products and projects from the holiday mini... and at the end of this post is a link to the products that will be carrying over!

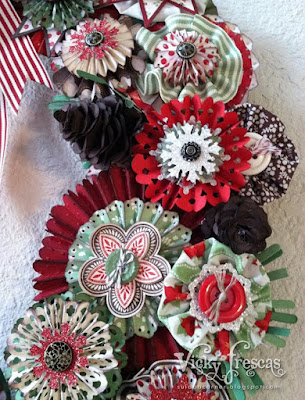
I really had a blast making this wreath at a class my downline, Michelle Walker, held.  It was a lot of work, but well worth it in the end!  This is a wreath I will be proudly displaying for many Christmases to come!

At the class, we could choose which products we wanted to use, and I chose the Holly Berry Bouquet product suite from the Holiday Mini catalog.


The wreath featured a whole lot of fan fold flowers using the brand new Simply Scored tool as well as some Yoyo's made from the Designer Fabric!  


Here is a gorgeous wreath my upline, Alecia Connelly, made using the Spice Cake product suite:


And here's the one that started it all - made by the class instructor (and my downline AND BFF), Michelle Walker! :o)


Speaking of the Spice Cake product suite (which happened to be my favorite from the catalog) - I used it to make a Thanksgiving scrapbook page:


...and a lovely birthday card!:


Lastly, I made a witches hat with a hodge podge of products!


I featured a distressed banner using the Hand-Penned holidays stamp set from the Holiday mini:


For the loads of seam binding ribbon, I jut hand-dyed our very vanilla ribbon using the Cajun Craze and Concord Crush reinkers!  I think they turned out great! :o)

So.... if there's anything you fell in love with in the Holiday Mini catalog, get off your patootie and into my online store to get your order in before midnight MST!  And while you're there, don't forget to check out the clearance rack blitz still going on until January 5th!!!

Click here to view the holiday mini in PDF format.

Click here to see the carryover flyer for the holiday mini! (These are the products that will still be available to order after the 3rd).


Saturday, October 30, 2010

Halloween Invite & Swaps (+ Founder's Circle!)

Wow!  Halloween's tomorrow, and I realized I forgot to post all these goodies!

First, here's a quick Halloween invite I made for a friend... she purchased the supplies and I provided a step by step tutorial, and she was able to make them all on her own! :o)


The idea came from the IBC (with some slight modifications).  I used the Graveyard Gala stamp set and the following color scheme:  Pumpkin Pie, Elegant Eggplant, Old Olive, Basic Gray and Basic Black.  Oh, and of course... some smooch!  The spray behind the gravestone is one of my custom colors:  Cherry cobbler!

Next are a batch of great swaps I got back from a swap I participated in from Splitcoast Stampers (some didn't have names on them, so if it's yours, let me know and I will gladly add the credits!):

Created by:  Charlotte R.


Created by: Anne Bamert


No Name :o(


Created by:  Michelle Hamilton


Created by: Andrea

All of the following swaps are Halloween swaps I got from my Founder's Circle trip!


Created by: Lynsay Mahon


Created by:  Dawn Griffith


Created by: Laurie Krauss


Created by: Deb Valder


Created by:  Tami White


Created by: Patty Bennett


Created by Jenny Watson


Created by: Mary Kay Molnar


Created by:  April Roycroft

Well, I think that's it for me for Halloween this year... I hope every one has a safe and spooky night tomorrow! :o)


Tuesday, October 12, 2010

Halloween Extravaganza - Day 12

Today is the last day of my Halloween Extravaganza, and I saved my favorite project for last!  We made this "BOO" banner in my hostess club last month, it was so very fun!


Each pennant was made using Basic Black Card stock and paper from the in-color Patterns DSP stack.  We used a different color for each pennant:  Peach Parfait, Concord Crush and Pear Pizazz.  We stamped on the  black card stock using the "From the Crypt" stamp set and Frost White shimmer paint.  

The letters were cut out using the Alphabet Simple Letters Big Shot die and they were mounted on a fan-fold flower (find a great tutorial for those here).  We hung the pennants on a yard-long piece of 1-1/4" striped grosgrain ribbon (in Basic Black) and tied individual bows above each pennant in their coordinating color of 1/2" stitched poly ribbon.


Thanks so much for joining me during my Halloween Extravaganza!  I hope you had a great time on got lots and lots of inspiration for my projects! :o)


Monday, October 11, 2010

Halloween Extravaganza - Day 11

These are some "Thank You" treat bags I made for my club members last month!


I used the mini lunch sacks in the holiday mini and the House of Haunts stamp set.


On the tags, I punched the end using the scallop edge border to match the scallop edge on the bag.  I tied them on using 1-1/4" pumpkin pie striped grosgrain ribbon and some of the raven lace from the mini.


On the front of the bag, I placed a couple of bats using the bitty bat punch and I used the following technique to create a moon behind my tree and owl image:


Using whisper white craft ink and a sponge dauber, I swirled on a circle and then dabbed a little bit of so saffron craft ink in the middle of the moon.


Then I just stamped the tree image overlapping the moon in basic black classic ink.

Tip:  When stamping on the lunch sacks, insert a thin piece of chipboard to flatten out the surface (so the sides  that are folded in won't interfere with your stamping!)


Sunday, October 10, 2010

Halloween Extravaganza - Day 10

Here's a cute and simple Halloween Card using the Spider Web embossing folder and the debossed/letterpress effect I used on this card in my August clubs.  This time, I used Basic Gray card stock and ink and sprayed Silver Foil Smooch Spritz to finish.


I also used the Greeting Card Kids and House of Haunts stamp sets.  I colored the little witch using blender pend and classic ink.


Saturday, October 9, 2010

Halloween Extravaganza - Day 9

Just a quick one today, my friends!  Today was our 8th Annual Holiday Stamp Camp, and I am dead tired!  Oh... and I have to get ready for my hostess club tomorrow! :o)


Another super-easy to do Halloween Treat!  Candy bar wrapper!  Simply, use your favorite Stampin' Up DSP (I used "Nite Owl" from the Holiday Mini), cut it a bit longer and about 2-1/2 times wider than your chosen candy bar and wrap that baby up!  Sticky Strip is definitely the best adhesive to use.  I also like to use my paper crimper to crimp the ends.  

For the accents on my candy bar wrappers, I used various stamp sets: Dark & Dreary (Holiday Mini), Wicked Cool, and All Holidays.  I also used (surprise, surprise) more waffle paper on one of them sprayed with some Silver Foil smooch spritz.  It added a beautiful (yet spooky) touch! 


Friday, October 8, 2010

Halloween Extravaganza - Day 8

This is a fun little Halloween ornament using the sweet treat cups that go perfectly with the Sweet Centers Stamp sets!


The ornament is made with 2 cups, placed back to back, so the image has been stamped twice on two pieces of card stock to make two sides.  And of course, my favorite Halloween accessory has been that black waffle paper... I just can't get enough of it! :o) Before sticking the two sides together, I ruffled a whole bunch of it between the layers.


Hasta manana mi amigos! :o)


Search My Blog