Showing posts with label Thanksgiving. Show all posts

Wednesday, November 14, 2012

October Club Projects

Yay! I'm catching up... and in this case, the holiday I'm posting for hasn't passed yet! LOL

In October we did some very fall-festive projects!  The first on was a table setting duo that was completely inspired by a fellow demonstrator, Maree Streeter, from Canada!  This project uses several Big Shot dies!  First, the cutlery holder is made from the Petite Pocket die, while the box is made from the Candy Wrapper die.  The labels are from the Labels Collection framelits and the corn and flower images were stamped using the Perfectly Preserved stamp set and then cut out using the matching Cannery framelits set, which can be purchased in this bundle!


We also made a fall/thanksgiving card using the "Triple Time" technique.  You can find an excellent "how to" on this technique here! For our card we used the Wonderfall stamp set from the Holiday mini and the coordinating Autumn Accents Bigz die to cut out our leaves for the front.  Each leaf was embossed in a different embossing folder (we used the Square Lattice, Woodgrain and Perfect Polka Dots folders).


Tuesday, January 3, 2012

Saying goodbye...

Today is the last day to order from the Holiday Mini Catalog before the Occasions Mini goes live tomorrow!

Here's a few of my favorite products and projects from the holiday mini... and at the end of this post is a link to the products that will be carrying over!

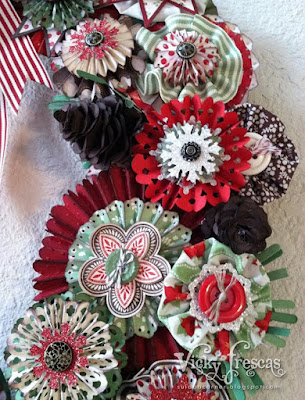
I really had a blast making this wreath at a class my downline, Michelle Walker, held.  It was a lot of work, but well worth it in the end!  This is a wreath I will be proudly displaying for many Christmases to come!

At the class, we could choose which products we wanted to use, and I chose the Holly Berry Bouquet product suite from the Holiday Mini catalog.


The wreath featured a whole lot of fan fold flowers using the brand new Simply Scored tool as well as some Yoyo's made from the Designer Fabric!  


Here is a gorgeous wreath my upline, Alecia Connelly, made using the Spice Cake product suite:


And here's the one that started it all - made by the class instructor (and my downline AND BFF), Michelle Walker! :o)


Speaking of the Spice Cake product suite (which happened to be my favorite from the catalog) - I used it to make a Thanksgiving scrapbook page:


...and a lovely birthday card!:


Lastly, I made a witches hat with a hodge podge of products!


I featured a distressed banner using the Hand-Penned holidays stamp set from the Holiday mini:


For the loads of seam binding ribbon, I jut hand-dyed our very vanilla ribbon using the Cajun Craze and Concord Crush reinkers!  I think they turned out great! :o)

So.... if there's anything you fell in love with in the Holiday Mini catalog, get off your patootie and into my online store to get your order in before midnight MST!  And while you're there, don't forget to check out the clearance rack blitz still going on until January 5th!!!

Click here to view the holiday mini in PDF format.

Click here to see the carryover flyer for the holiday mini! (These are the products that will still be available to order after the 3rd).


Saturday, November 13, 2010

"Thankful" Banner

Hello friends!  Here is a Thanksgiving banner I made for my fireplace mantle using the Day of gratitude stamp set and the custom ink pad technique we did in club last month.  The banner was completely inspired by a fall banner I saw at the St. George Regional made by SU's #1 Demonstrator of the year, Kimberly Van Diepen!


Here are each of the banner pieces close up... I have provided a list of primary supplies at the end of this post!


(Your eyes are not deceiving you.... the ribbon above and below has been dyed in Cajun Craze and More Mustard! Stay tuned for a video tutorial on this soon.... for those who attend my club workshop, we'll be learning how to do this on Sunday!)


My favorite aspect of this project was the gathering techniques for the ribbon!  (Another technique I'll be demoing in my club workshop this weekend!) ;o)


Another custom dyed ribbon in More Mustard:


Here's just a quick look at what each banner piece looked like at the beginning... After stamping my images using my custom ink pad, I sprayed three layers of my custom Smooch Spritz colors:  1) a liberal spraying of Crumb Cake, 2) A couple of squirts of Soft Suede, 3) one spritz of Early Espresso. 


After the pieces dried, I distressed the edges and inked them with some crumb cake.

Here are the primary supplies and colors used for the project:

I also used a big variety of our ribbons, buttons, and other hardware to put the finishing touches on this project.  If you have any questions at all about them, please ask! :o)  

Thanks for looking, and I hope you have been inspired to make your very own Thanksgiving banner!


Thursday, October 21, 2010

October Club Projects

Here are the projects we made in my hostess club this month!  

At the request of this month's hostess, we made a slider card for Christmas.  These cards are so much fun!!! I mean, who doesn't love a card that surprises you? ;o)


We used lots of fun new products in the Holiday mini:  Designer fabric, waffle paper, big shot dies, punches, ribbon and stamp sets!  The color scheme we used was Cherry Cobbler, Always Artichoke, Crumb Cake and Soft Suede.  The card was based off of this tutorial on the SCS website.  


The stamp sets we used were Christmas Collage and Bells & Boughs from the holiday mini.  We also used the Winter Post set from the IBC (one of my favs).  We die cut the fabric using the new Tasteful Trims XL die from the mini.  To get the "distressed" look in our fabric, after cutting it, we wadded it up and rolled it around a bit in our hands.  After placing it on the card front, we added a few pearls for an added touch.


Our second project was my twist on the ever-popular Sweet Treat Turkey Guy!  I switched it up a little using the gorgeous "Day of Gratitude" stamp set and the ornament punch, and I mounted him on a tent card so he can stand on his own for perfect placement at the Thanksgiving dinner table!  Wanna know how we did it?  Read on!


First, you will need to ensure you have all of the following pieces (Click on pic for a larger image).  


The color scheme I chose was to coordinate with the fall-themed m&m packs that are out right now.  So I used Cherry Cobbler, Early Espresso and More Mustard.  Notice that several pieces have little "nips" taken out of them using the 1-3/4" circle punch.  

To get the beautiful gradiated stamped image, I created my own ink pad using a piece of felt with a plastic tray underneath and SU re-inkers.  I started with a circle of Early Espresso, added some Cherry Cobbler around it, and then some More Mustard as the last ring of color.  


I made sure the finished ink pad was big enough to accommodate my image, and then started stamping away.  Honestly... I couldn't stop.  The image was so gorgeous and striking, I filled about 5 sheets of Whisper White card stock. LOL.  I am going to make these for my own thanksgiving table, so I figured I'll have a head start! 


Then, I used my craft knife to cut out the flower image and then used the 1-3/4" punch to cut out my circle.  You can use the image above as a guide for placement.  Basically, I used the mini-flower in the center of the image as my guide.  I placed the top of the circle right at the top of that image.

Meanwhile, you'll also want to stamp two of the leaves in Early espresso and cut those out.  Don't forget to "nip" them, too! 

To assemble your turkey, Start with a sweet treat cup and adhere the 2-1/2" circle with the 1-3/4" circle punched out.


Add the ornament punch-outs starting with the sides and moving to the top:


You can then add the stamped flower image and then the two stamped side wings.  (I used a dimensional to adhere the "wings").   For the face, add your choice of "google" eyes and craft a simple beak out of scrap cardstock.

Once you've got all the front pieces on, you can flip your turkey over and fill 'er up!  Use the solid 2-1/2" circle to close up the back.  


If you plan to mount your turkey on a tent card, you should have the tent card assembled like so:


Before I mounted my turkey on the tent card, I used my custom ink pad and stamped the "Happy Thanksgiving" sentiment from the Thankful For stamp set onto whisper white cardstock.  I curled the middle and ends a bit using a pencil and lined it up with the bottom edge of the tent card.


Then I added my finished turkey!


Wednesday, November 18, 2009

Owl Treat Bag

Isn't this the cutest idea? :o)
Big Shot Top Note die; Circle punches; Scallop Circle Punch
CS: Crushed Curry, Soft Suede, Dusty Durango; Basic Black; Very Vanilla


Tuesday, November 17, 2009

Thanksgiving Placemat

I am barely getting around to creating (and posting) several of the Stamp Camp projects from last month! I really love this idea for Thanksgiving placemats, and I will be making them for the kids table for Thanksgiving this year!
Stamp Sets Used: Autumn Splendor (Holiday Mini), Lovely Letters Alphabet
Cardstock: Always Artichoke; DSP: Autumn Traditions
Classic Ink Colors: Always Artichoke, Really Rust, More Mustard, Elegant Eggplant
Other: Big Shot/Scallop Square Die; Texture Plates Kit #4; Scallop Edge Punch


Wednesday, October 14, 2009

Thanksgiving Double Slider Card

Just a fun little Thanksgiving card I did a while back using this Double Slider Card tutorial from SCS. :o)
For the leaves, I stamped the leaf image in Chocolate Chip then colored in the leaves with the Versamark pen and used my Stampin' Pastels to add various shades of color.
Supplies Used: (Stamps) Autumn Splendor, Grateful Greetings (holiday mini); Autumn Splendor DSP (Holiday mini); Versamark Pen; Stampin Pastels


October Club Projects

Here are the Thanksgiving projects we made this month in my clubs!
This Thanksgiving Card uses 3 of this year's in-colors which I feel are perfect for fall-themed projects: Crushed Curry, Dusty Durango and Soft Suede.
This card is so easy to make, yet so versatile! I grabbed the idea from SCS - you can view the tutorial here and a whole gallery of cards made like this here. I used the "Rock N Roll" technique for the two images on the front.
Stamps used: Falling Leaves, Wandering Words (from holiday mini)
To download full supply list and instructions, click here.
This cute little place card was tons of fun, and the Turkey guy is made completely out of Stampin' Up! punches!

Stamps Used: Falling Leaves, Just Perfect Alphabet
To download full supply list and instructions, click here.
And here's a pic of the guide I provided at the tables to make assembling this dude a lot easier!


Search My Blog