Showing posts with label DSP. Show all posts

Tuesday, August 6, 2013

April Club Projects: Mother's Day

One more post away from getting caught up with my past club projects! :o)  But here are the projects we did in my April club which was geared towards Mother's Day:

First was a very cute tea bag holder, completely inspired and cased from fellow demonstrator Heidi Baks.  You can find her full instructions for this here.

I used the Tea Shoppe stamp set from the 2012 Annual Catalog (digital is still available) as well as the Tea for Two DSP.  And if you missed this beautiful pattern from the Occasions catalog, you can get it in a whole new color scheme in the Afternoon Picnic DSP from the new Annual Catalog or get the digital version!

As our second project, we made a very classy Mother's Day card using the Dress Up framelits and the Flowering Flourishes and Friendly Phrases (retired but still available in digital) stamp sets:


The "Happy Mother's Day" sentiment is from the Teeny Tiny Wishes set:


Wednesday, November 14, 2012

October Club Projects

Yay! I'm catching up... and in this case, the holiday I'm posting for hasn't passed yet! LOL

In October we did some very fall-festive projects!  The first on was a table setting duo that was completely inspired by a fellow demonstrator, Maree Streeter, from Canada!  This project uses several Big Shot dies!  First, the cutlery holder is made from the Petite Pocket die, while the box is made from the Candy Wrapper die.  The labels are from the Labels Collection framelits and the corn and flower images were stamped using the Perfectly Preserved stamp set and then cut out using the matching Cannery framelits set, which can be purchased in this bundle!


We also made a fall/thanksgiving card using the "Triple Time" technique.  You can find an excellent "how to" on this technique here! For our card we used the Wonderfall stamp set from the Holiday mini and the coordinating Autumn Accents Bigz die to cut out our leaves for the front.  Each leaf was embossed in a different embossing folder (we used the Square Lattice, Woodgrain and Perfect Polka Dots folders).


Thursday, August 2, 2012

June Club Projects with Tutorials

I never got around to posting the June club projects, so here they are now!

First was a birthday card using all of the new 2012-2014 in-colors: Gumball Green, Raspberry Ripple, Summer Starfruit, Midnight Muse, and Primrose Petals. We used the Patterned Party and Itty Bitty Banners stamp sets with the coordinating Bitty banners framelit die. We also used the Large Scallop Edgelit die:

Click here for the class tutorial in PDF format

For our second project, we used the Clear Mount Stamp Cases and created a notepad holder:


We used the Pleasant Poppies stamp set to create the design for the outside cover along with patterned paper from the Polka Dot Parade DSP and designer series paper patterns stacks. We punched our butterflies using the new Elegant Butterfly punch.

On the inside we created a handy pocket (perfect for coupons) and added a few more butterfly touches with the Beautiful Butterflies Bigz die and the Perfect Polka Dots embossing folder:

Click here for the class tutorial in PDF format


Sunday, July 29, 2012

Petite Purse Die

I have really enjoyed using the petite purse die! It is so easy to assemble, which is why it has been my "go to" die for a couple of recent projects where I had to make multiples!

These are the thank you gifts I made this month for my club members:


I love using window sheets for my treat boxes whenever I can! I filled these with either jelly beans or m&m's. Since these candies are so small, I used transparent tape at the two bottom side edges to make sure nothing fell out. I also used a small piece to make sure the flap stayed securely closed. With the thicker acetate, it is hard to get it to hold the rounded shape and stay closed. :-)

In place of the handle cut by the die, I chose to use some ribbon instead. The sentiment was stamped and punched using the lovely little labels stamp set and the coordinating little labels punch set.

I used the Boho Blossoms and Bird punches for the flower accents. When making multiple embellishments like these, I like to assemble and layer them like so on a strip of glue dots:

A second project I made with the petite purse die was a set of 80 treat bags for the teachers and staff at my son's school. Inside were a few star peppermints and a coupon for a free class of mine. I made them in all assorted colors coordinating with the Summer Smooches Designer Series Paper:


Tuesday, January 3, 2012

Saying goodbye...

Today is the last day to order from the Holiday Mini Catalog before the Occasions Mini goes live tomorrow!

Here's a few of my favorite products and projects from the holiday mini... and at the end of this post is a link to the products that will be carrying over!

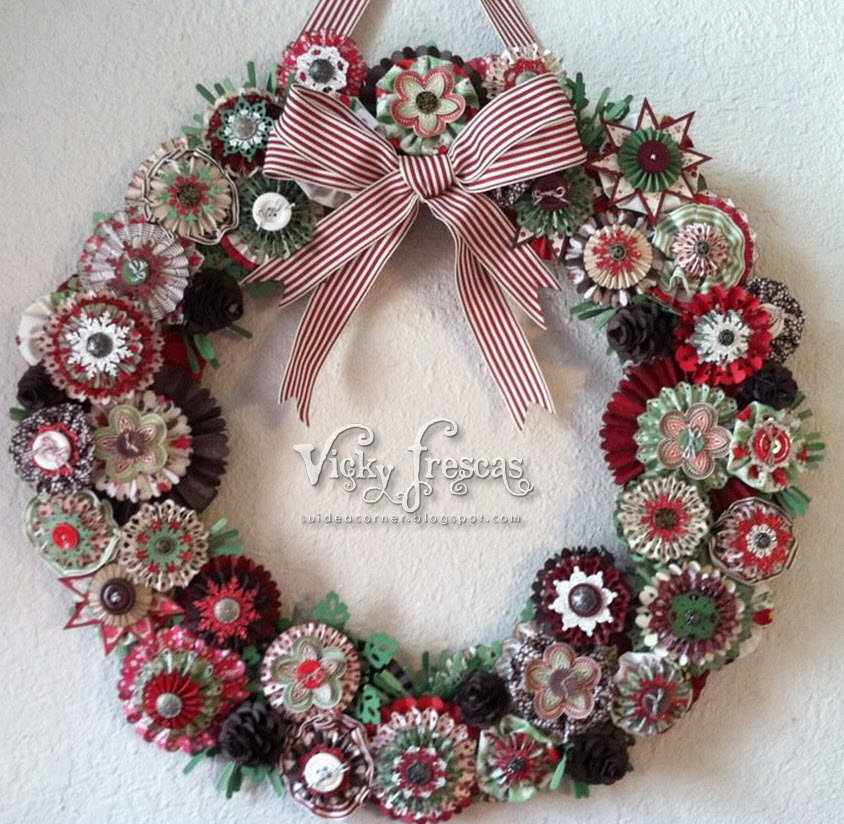
I really had a blast making this wreath at a class my downline, Michelle Walker, held.  It was a lot of work, but well worth it in the end!  This is a wreath I will be proudly displaying for many Christmases to come!

At the class, we could choose which products we wanted to use, and I chose the Holly Berry Bouquet product suite from the Holiday Mini catalog.


The wreath featured a whole lot of fan fold flowers using the brand new Simply Scored tool as well as some Yoyo's made from the Designer Fabric!  


Here is a gorgeous wreath my upline, Alecia Connelly, made using the Spice Cake product suite:


And here's the one that started it all - made by the class instructor (and my downline AND BFF), Michelle Walker! :o)


Speaking of the Spice Cake product suite (which happened to be my favorite from the catalog) - I used it to make a Thanksgiving scrapbook page:


...and a lovely birthday card!:


Lastly, I made a witches hat with a hodge podge of products!


I featured a distressed banner using the Hand-Penned holidays stamp set from the Holiday mini:


For the loads of seam binding ribbon, I jut hand-dyed our very vanilla ribbon using the Cajun Craze and Concord Crush reinkers!  I think they turned out great! :o)

So.... if there's anything you fell in love with in the Holiday Mini catalog, get off your patootie and into my online store to get your order in before midnight MST!  And while you're there, don't forget to check out the clearance rack blitz still going on until January 5th!!!

Click here to view the holiday mini in PDF format.

Click here to see the carryover flyer for the holiday mini! (These are the products that will still be available to order after the 3rd).


Sunday, June 26, 2011

June Club Project

This was our last club before I took my "baby hiatus", so I decided to go all out!!!  I gave my hostess club members a choice of three different stationary box sets to make:

Choice #1 used the Woodland Walk DSP & Coordinating Colors:

Choice #2 used the Love Letter DSP & Coordinating Colors:

Choice #3 used the Elegant Soiree & Coordinating Colors:

When folded up, the boxes looked like so:


And each box contained 4 different card designs and 4 mini notecards:


Here is a link to the tutorial I put together for the workshop!  
It is very easy to adapt to any other DSP collection!

Everyone did such a wonderful job on their projects... I am going to miss all my lovely stampin' gals while I take my little break!  I'll see all you beauties when we start back up again next year!!! :o)


Friday, October 1, 2010

Halloween Extravaganza - Day 1

I am kicking off my Halloween Extravaganza with one of the projects we made at club last month!

These sour cream treat-holders are just perfect when you are pressed for time and need to make several at one time!  They are so simple!


There is an excellent tutorial here on SCS for these quick and easy treats! Check back tomorrow for Day 2 of the Halloween Extravaganza! I'll be giving you a sneak peek at one of the Stamp Camp projects!

Supplies used: "Wicked Cool" stamp set; "Wicked Fun" Specialty DSP; Pumpkin Pie patterned DSP (retired); 1-3/4" Scallop Circle Punch; 1-3/8" Circle Punch; Spider Web Embossing Folder; Ribbon: "Raven" 1/2" Lace Trim, Concord Crush 1/2" Stitched-Poly Ribbon, Rich Razzleberry 3/8" Taffeta Ribbon; Paper Crimper; Crop-a-dile


Monday, July 26, 2010

Recent Card Swaps

In addition to the card we used in this month's club projects, here are two more cards I submitted for a swap with some of my fellow demonstrators!

This card uses the Level 2 hostess set, "Cute by the Inch" as well as the lovely hummingbird in the "Elements of Style" set. There's also a bit of Greenhouse Gala DSP on there!

This next card uses the "Friends Never Fade" set from the new IBC and features several of the new (and retuning) colors: Melon Mambo, Tangerine Tango, Daffodil Delight, Wild Wasabi and Pacific Point. The sentiment was so fun to do! I used my sponge daubers to create a blend of all my colors then stamped the image on top in Basic Black. This is a great image to use this technique on!


July Club Projects

Sorry I've been so scarce on the blog lately! I've had a heavy work schedule to contend with lately and am finally getting around to catching my breath!

Here are the club projects we completed this month!

First, we altered this giant clothespin by covering it with the Newsprint DSP and distressing the edges with Crumb Cake and Soft Suede ink:


The tags were all made from the "Artistic Etchings" stamp set in the new IBC. We used the corner rounder punch to round the corners and set eyelets in each one with the Crop-a-dile. We threaded all of them on some 1/8" Basic Black taffeta ribbon and tied it through the inside of the clothespin. It makes a very lovely note or photo holder!

Our second project was a card we made using the "Because I Care" Level 1 hostess set. I also submitted this same card design in a recent swap I participated in:
The card featured two of the new in-colors: Blushing Bride and Pear Pizazz. We used the exclusive Stampin' Up embossing folder: Elegant Bouquet and ran a piece of vellum card stock through the Big Shot. Then, we stamped the hydrangea and it's loose blooms in the un-embossed area. After giving it a few minutes to dry, we turned the vellum over and used markers and blender pens to color in the flowers and stem. We stamped a background on the Blushing Bride card stock before adhering the vellum on top of it. We used the new Smooch Illuminate Top Coat Accent Ink on the raised portion of the embossed image to finish off the card front.


Friday, May 21, 2010

AWF & Summer Mini Card Swap

Here are some card swaps I did a while back using the Awash with Flowers set and products from the summer mini:


Stamps Used: Awash with Flowers, Wonderful Favorites; Color Scheme: Melon Mambo, Wild Wasabi. Tempting Turquoise, Tangerine Tango


Stamps Used: Tropical Party, Rough Type; DSP: Island Oasis; Color Scheme: Chocolate Chip, Kraft, Tempting Turquoise, Pumpkin Pie, So Saffron, Rose Red, Old Olive; Big Shot Square Lattice Embossing Folder


Stamps Used: A Little Bit of Magic; DSP: Cottage Wall; Color Scheme: Rich Razzleberry, Orchid Opulence, Old Olive, Confetti White; Smooch Spritz in Vanilla Shimmer

I absolutely love Love LOVE using the smooch spritz! :o)


Tuesday, April 6, 2010

Mother's Day/Easter Swap

Last month I participated in a swap with some of my fellow demos... sorry I'm just getting around to posting these... but I just had to share! :o) I love them all!!!


Search My Blog